Are you an upcoming writer, artist or freelancer wondering how to start a blog that earns money? Then read this article.
In this ultimate tutorial guide for beginners, I would show you how to start a blog in 2020 without any coding or technical experience.
This article follows a step-by-step approach that is very easy to understand. At the bottom of this article, you would find frequently asked questions (FAQs) on blogging to help you on your journey to becoming a blog master.
I started my blog because I did not want to work in an office after I left University. I needed a way to earn enough money to pay for bills and also live a comfortable lifestyle. The journey to financial freedom has been long for me, but I am writing this article so that you wouldn’t have to make the same mistakes I made.
In this guide, I am going to walk you through a 17 step process that would show you the ins and out of blog creation and how to also earn a living from it.
Let’s get started.
Why Start a Blog?
Firstly, what is a blog?
A blog is a website that contains articles or entries that are displayed in a reverse chronological order. What this means is that the posts are shown from the newest entry to the oldest.
So what are the reasons you should start your blog?
- You just want to write:Are you looking for a platform to just share your stories, ideas, and thoughts, you could start your blog.
- Create a following and drive leads to your brand:It doesn’t matter if it is a new company or an existing organization, you can use a blog to bring exposure to the brand or drive leads to the product you are selling.
- Make money online:Starting your blog is one of the most popular ways to make money online. It is appealing to many because you can work from anywhere in the world. All you need is a phone or laptop and a good connection to the internet.
- Build an online presence:You can become an influence or an authority in a field by writing on a blog. As an author, publishers would most likely accept to publish your books if you have a preexisting online followership.
A blog means a lot of things to many individuals, but the benefits of starting one is the same.
These are the easy steps you can follow to get your blog up and running in less than 30 minutes with no programming or technical experience.
Step 1: Choose a Category
The first and most important thing to do when starting your blog is to choose what category you would be blogging about.
If you plan on earning a living or monetizing your blog, you would make a lot more progress when you have a specific niche that your blog posts are directed towards.
Having a blog that is directed towards a specific category also helps your SEO. Google would most likely show your blog in the search engine when it is focused on a single topic rather than several.
Choose a category/niche for your website, then stick to it.
These are some of the most popular blogging categories:
- Health
- Fitness
- Personal Finance
- Business
- Productivity
- Real estate
- Freelancing
- Recipes and lots more
If you want to get more juice from Google and search engines, you can still niche it down more. You can decide to start a freelance blog specific for writers or a recipe blog for vegans.
You should avoid making your blog very broad because this makes it very difficult to monetize. Broad categories have a lot of competition and few means of monetization.
A good example is the celebrity blog category. The competition is fierce and the payoff can be little compared to more streamlined categories. If you really wanted to open a celebrity blog, you can decide to start a strictly Hollywood celebrity blog instead of a huge combo that consists of actors, musicians, sports stars, etc.
There are categories that are popular but can be difficult to monetize. Hobbies category is an example.
I am not saying you cannot make money from this category. It is very possible. They are bloggers making tons of money from teaching how to play musical instruments or fishing. The only problem is that most people are not ready to spend money on their hobbies.
With the right strategy and marketing plan in whatever niche, no matter how obscure, you can definitely earn a living doing what you love.
Step 2: Pick Your Blog Name (Find a Domain)
How can you pick the right name for your blog?
First, when starting out with your new blog you might not know which domain name to use. You don’t have to fear or worry.
When you use a legit hosting company, they give you the option to choose a name later and continue with the rest of the registrations. They make it very easy for you to start creating your blog without any hiccups.
Choosing your blog name is one of the most important things you do when learning how to start a blog. The name defines your brand and it is what your readers would use to search for your content.
There are several options you can use to choose a blog name. You can decide to choose a name that is related to the niche you are blogging about.
For instance, you are in the dog food niche. You can call your blog food4dogs.com. This name is perfect because it has searchers intent and anybody who sees your blog would know exactly what it is about.
If you plan on branding the blog with your self, you can use the name instead. Choose yourname.com or yournickname.com.
After selecting the name for your blog, the next step would be to choose the right blogging and hosting platform for your new website. It is this hosting that would allow your blog to be live on the Internet and also give your readers access to read it online.
The next step would be for you to choose your hosting plan.
Since it is your hosting plan that ensures that your blog remains online, it is advisable that you choose a plan that is stable and would offer you a sufficient amount of security.
For a new website owner, I recommend that you use the Choice Plus Plan. This is the best plan you can start out with as a newbie especially when you are on a budget.
The Choice Plus Plan comes with Domain Privacy. What domain privacy means is that Bluehost would guard your personal information. Things like your full name, email address, phone number, and home address would not be published or found anywhere on the internet.
To avoid making any mistakes, use the image below as a guideline. All you have to do is click on the green button to choose the hosting plan of your choice. There are three main plans for starters : basic, plus and choice plus.
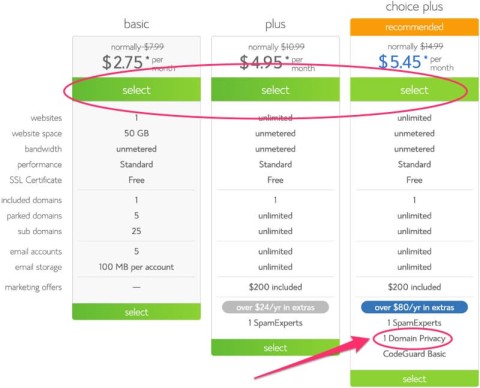
Like i earlier said, I would prefer you select the Choice Plus Plan because you get some add ons like Domain Privacy and Codeguard Basic which would not be available in the other two plans. It is also very cheap and you get over $80/yr in extra benefits.
If you decide to go for the basic or plus plan, you would have to pay for your domain privacy separately. It goes for the rate of $1/mo.
After you have selected the plan of your choice, the next step would be to choose your domain name.
Choose your domain name
You would be redirected to the page where you would have to pick the domain name of your blog after you have selected your hosting plan.

This area is fairly straightforward. We have discussed earlier the process of choosing a name for your blog. It is this name that you have chosen that you would use as your domain name. For example, I choose thezeroed.com as my domain name.
There are times when the domain name that you have in mind might have already been used or won’t be available. You can then choose another name or can decide to choose a domain name later. Being able to choose your domain later gives you the freedom to continue building your new blog without any hindrance and also have enough time to think of a name.
If you want to choose your domain later, click on the “Choose Later!” button circled in the image below.

After you are done with this step, i.e choosing your domain name or deciding to get a name later, you move to the final step in the process of building your Bluehost account.
The last and final step in the signup process is creating your Bluehost account.
There are two methods you can use in creating your Bluehost account, you can decide to do it manually or automatically by connecting it to your Google account.
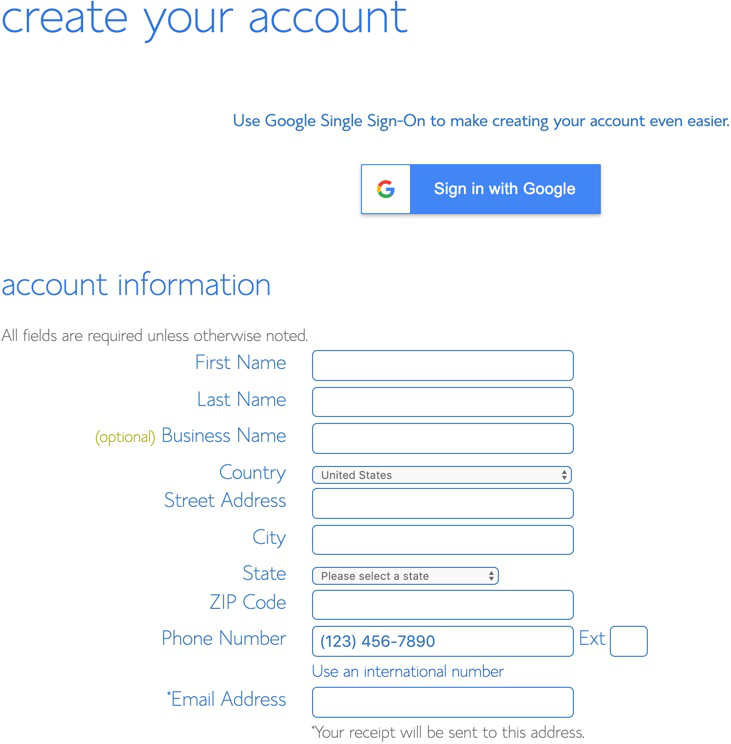
Ensure that the email address you choose is your most current email address. It is in this email address that important information like your login details and account information would be sent to. If you put in the wrong information, you would have to start the entire process all over again.
The next step would be to select the hosting package of your choice
This page is where you would select your account plan based on the price range. You would also decide how far into the future you would want to pay for your hosting plan.

Bluehost would not offer you a monthly payment plan. The reason why you would have to pay long term is because companies that offer a monthly payment plan would charge you a lot more for hosting. You would be required to choose from the options of 1,2,3, or 5 years payment plan. No matter the plan you choose, you would still be getting a good deal and can get your blog online right away.
What payment plan do i recommend for you?
If you want to get the lowest possible price for your hosting, I recommend that you choose the “Prime 36 Month Prime“.This plan is perfect because you would get the domain privacy extra free of charge for the whole 36 months.
Note: This very low rate in price would only apply to new customers on their first payment. So if you choose to pay for the 1-year plan, the pricing for your hosting might go up during your next renewal. Choosing the 36-month plan would guarantee that you pay a low rate for the next 3 years. I understand that your budget might not be sufficient so I advise that you choose the longest payment duration that your budget can accommodate.
Should you choose the package extras that come with the payment plans?

Since you are just learning how to start a blog, it means that you have a smaller budget compared to most big companies. You can decide to do away with all the package extras. The only package extra that is very important to keep is Domain Privacy Protection.
As you keep on reading this article, I would show you several plugins & tools (both free and cheap) that you can use to replace the package extras.
No matter what you do, ensure that you have domain privacy on your website. This would ensure your personal contact information remains private. You don’t want to receive spam calls and emails from strangers that found your contact information on the internet. Choosing the Choice Plus Plan would grant you access to Domain Privacy without any extra charge since it is already included in the plan for free.
The total amount you see at the end is what you would have to pay today.
The duration of years you choose and the package would determine how long it would take before you would need to make any payment again. Remember that there is a money-back guarantee in case things do not go as you planned.
The final step would be to enter your billing information.
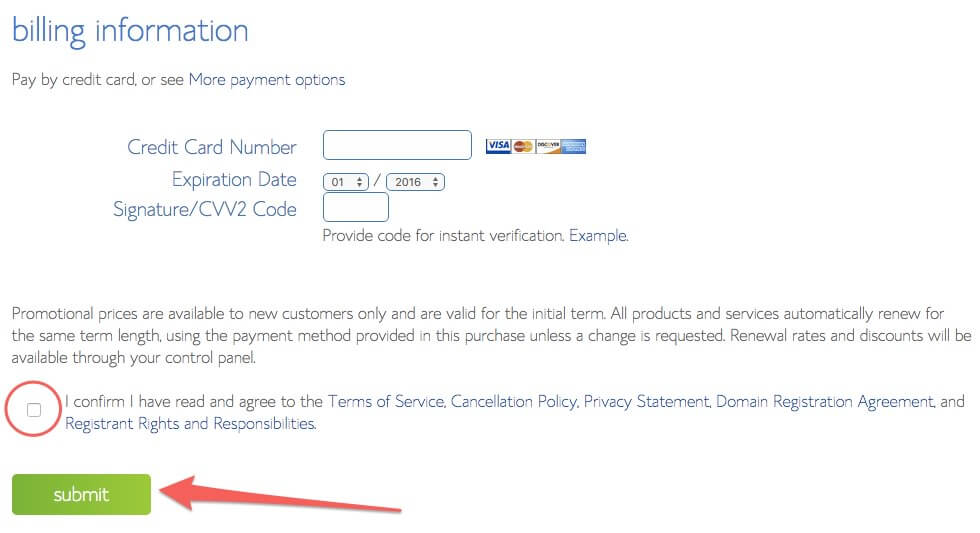
The last step in your sign up process is putting in your billing information. You can decide to pay using your credit card or by other payment options like PayPal. After inputting your billing information, you should check the box to agree to the Terms of Service of Bluehost then click the submit button.
Set a password.
When you have completed your purchase, you would be required to set a password for your new Bluehost account. Note that this password would be for your Bluehost account alone and not your WordPress blog. You can get into your WordPress site after you have logged into Bluehost very easily.
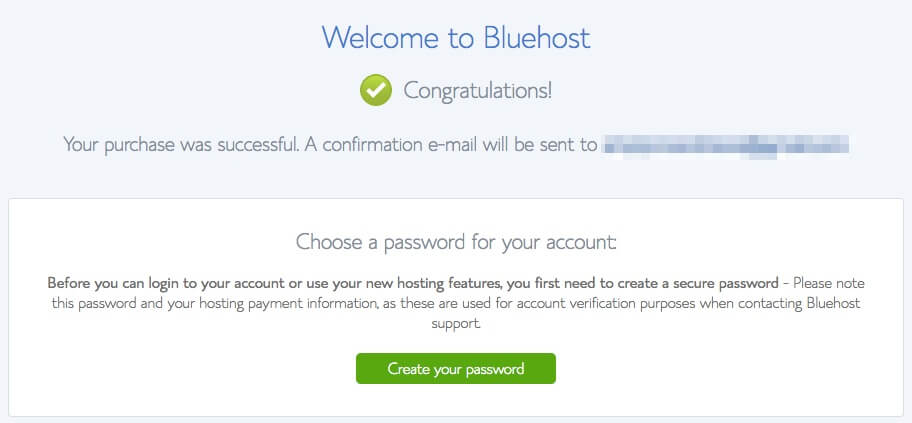
The next step would be to log in after you have created your password.

I recommend that you skip choosing any of the free themes that would be suggested to you by WordPress right away. Most of these free themes are not updated regularly. So unless you already have a good theme in mind, you can always come back to this step later. When you make use of outdated themes, you leave your site open for hackers because of poor security.
After you have become more acquainted with WordPress, you can then switch to a better theme other than the default theme that came with WordPress. We would talk about picking your theme template in Step 5.
Note that it would take within 2-24 hours before your new domain name would be fully registered.At the start, you would notice a temporary domain name in your search box. You don’t have to worry, it is very normal.

When your new domain that you choose is ready, Bluehost would automatically make the change for you. If you choose to use an existing domain from another host provider or opted to choose domain later, you can set it up at your own leisure. You can begin setting up your blog right away with your temporary domain.
In the early stages of your site, there would be a “Coming Soon” Page. This would tell new visitors that you are still working on the site at the moment. This is what the page would look like:
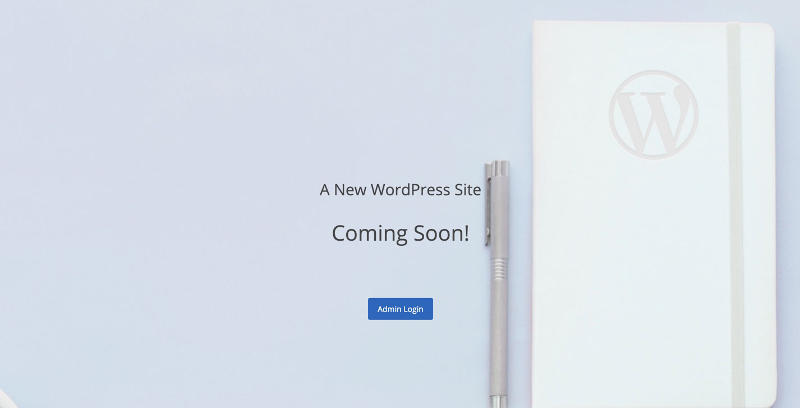
When you are done with your setup, you can now make your site visible to anybody on the internet with just a push of the button. We would still get to this process in the guide.
After you have logged into the site as an admin, you would then click the “Start Building” button to start working on your site.

Congratulations, you have taken the first big step on how to start a blog.
After you have successfully signed up, the next step would be setting up your blog and getting it fully optimized.
Step 3: Choose your Web host
Note: If you followed all the procedures in Step 2, you have already set up the hosting for your blog. You can then skip this step and move on to Step 4 of the tutorial guide.
While learning how to start a blog, this is the last step you would have to take in getting your blog live on the Internet. To make things very easy use for you, i recommend that you make use of Bluehost.
If you decided to use another web host other than Bluehost for your hosting and domain, you would still need to set up the hosting for your blog.
Since you are a beginner learning how to start a blog, I would start from the basics.
What is Website hosting?
This is a service that makes it possible for an individual or organization to upload a website or web page onto the Internet.
What is a Web host?
A web host also called a web hosting provider is a company that provides the technologies that make it possible for a website to be viewed on the Internet.
Where are the websites hosted or stored?
Websites are hosted and stored on a computer that are known as Servers. All your readers have to do to find your site types your website address/domain into their browser and your website would be displayed on their web browser.

Some of the features you should expect from your web host:
Email Accounts: Most web hosts would offer you an email account that would feature your domain name. You would be able to create domain email accounts (e.g marvellousahamadi@thezeroed.com).
FTP Access: FTP allows you to be able to upload local files from your computer right to your web server. If you have previous programming knowledge, you can build your website with your own HTML files, then transfer the files from your computer to your server using FTP and then it can then be accessed on the Internet.
WordPress Support: WordPress is one of the most popular website creation tool. It is also a very powerful website content management system. Out of all the websites on the Internet, WordPress powers 25%. As a beginner learning how to start a blog, you should use WordPress. It is very easy to use and has plans that are suitable for everybody. It also contains the latest version of PHP and also MySql Database version 5.6 or higher.
What are the best blog hosting services available?
There are hundreds of services available that you can use in hosting your website. But there are certain things you should be looking out for when making your choice.
These includes:
- Site speed
- Security
- Features
- Customer support
- Reviews/track record.
If you really want to get serious with your blog and earn a living from it, Bluehost has a sufficient amount of security and features that would give you much-needed peace of mind as a beginner content creator.
As we go on with the rest of this guide, i would assume that you have done all the steps from 1-3. That means you must have registered your domain name and choose the hosting plan that suits you. If you have not done that, take a few minutes of your time to set it up.
Step 4: Install WordPress
We are done with all the boring parts in the first phase of this guide. We have now gotten to the interesting part of how to start a blog.
It is at this phase we would discuss the layout of your blog, the design and much more. Since you are reading this guide, i would try and make the technical parts very easy to understand and follow.
Before we proceed, let’s explain some of the terminology that you would see frequently in this guide. This explanation would help you understand why WordPress is the right platform for you.
What is a Content Management System?
This is the platform where you would be doing all your designing, writing and publishing of your blog posts. A good CMS must be easy to navigate, easy to upload images and videos, easy to organize the contents of your blog and also offer you 100% control of how your website would look like.
The most popular CMS that is used is WordPress. Recent reports show that over 62% of blogs on the Internet makes use of this CMS. Some of the most popular websites that make use of WordPress include Forbes, NBC, TechCrunch, Thought Catalog and many more.
Should I use WordPress and is it free?
WordPress is not the only CMS option on the market. They are other popular ones like Wix and Squarespace that people use when learning how to start a blog. Although, WordPress is the most sustainable and the best option for long term blogging. It is also also the best platform if you are starting your blog with the intention of making money from it.
The mistake that most people make when starting out is that they don’t know that they are two different platforms that come with WordPress. We have WordPress.comand WordPress.org. They might be named similarly, but they have very key differences.
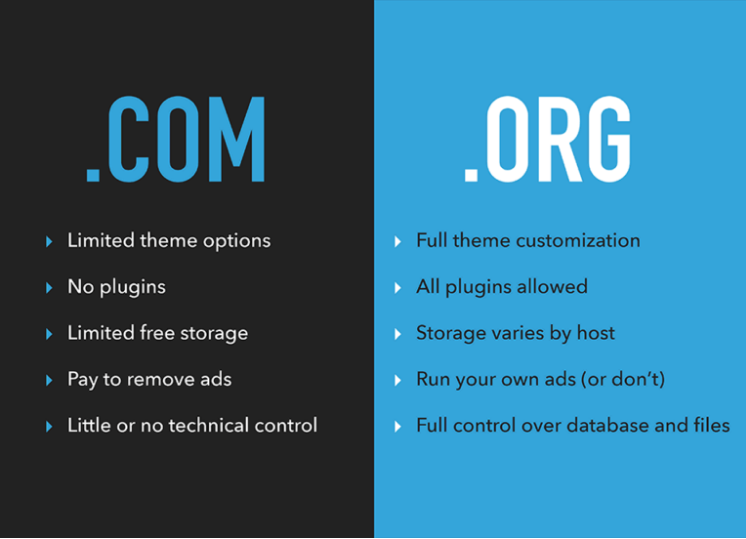
Differences between WordPress.com and WordPress.org:
WordPress.com:
- Free to use
- You cannot select a custom domain name (what you would get is yoursite.wordpress.com)
- Has very little ways to monetize your blog
- You cannot upload plugins
- You are stuck with very basic designs since there is no theme support
- You would have WordPress branding on your site
- Limited options for SEO and analytics
WordPress.org:
- You can customize as much as you like
- There are unlimited plugin options
- There is no WordPress branding
- Extensive SEO features that would make your site easy to find on search engines
- You can add an eCommerce store or membership site to your blog
- The fee you pay is small (approx $46-$100/year + hosting).
The Steps to Configure WordPress
These are the basic steps that you would need to take get your new blog running. You would need to familiarize yourself with the backend of your blog. It is while you are exploring that you would understand how WordPress works and the things you would need to do to make changes to how your site looks.
Welcome to the WordPress Dashboard
The first thing that you would see when you log into WordPress is the dashboard. It would look like this:
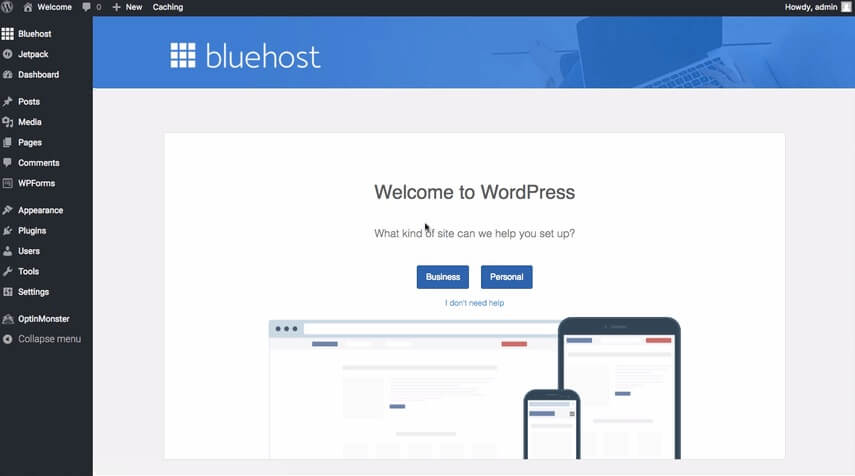
This area is the beating heart of your WordPress site. It is in this area that you would, publish your blog posts and manage anything that is related to your WordPress site.
It is better that you click on the button that says “I don’t need help” so that you can make discoveries on your own. That way you would get accustomed to how the platform works and streamline your websites to your taste.
Configure your settings.
Before you start to write or publish anything on your website, you would have to make some changes to your WordPress settings. This would save you a lot of trouble in the future.
As you are building your new blog, you would see several offers for add-ons at the top. To skip this, just close the boxes.

The first setting you should take care of is changing your username in the admin panel. When you first log in, your username would be set as “admin”. If you don’t change this username, hackers would find it very easy to hack into your site.
To change the username, go to Users > All Users.
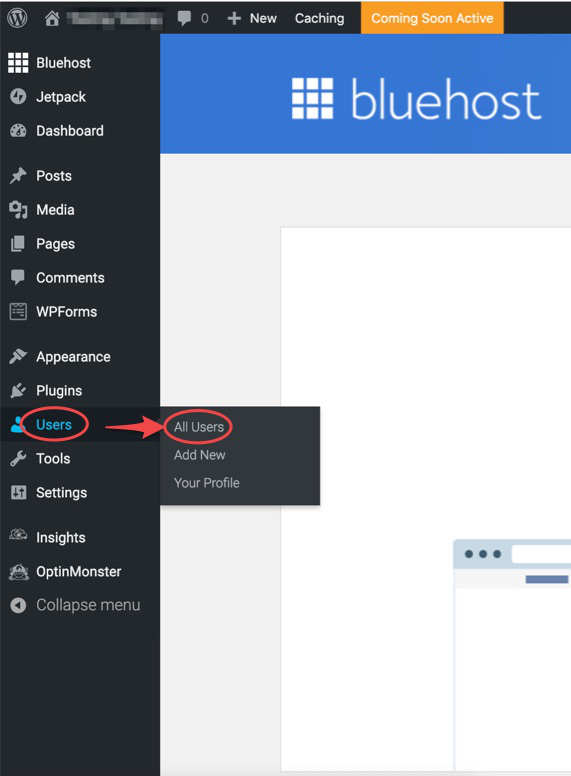
Look for where the username says admin.
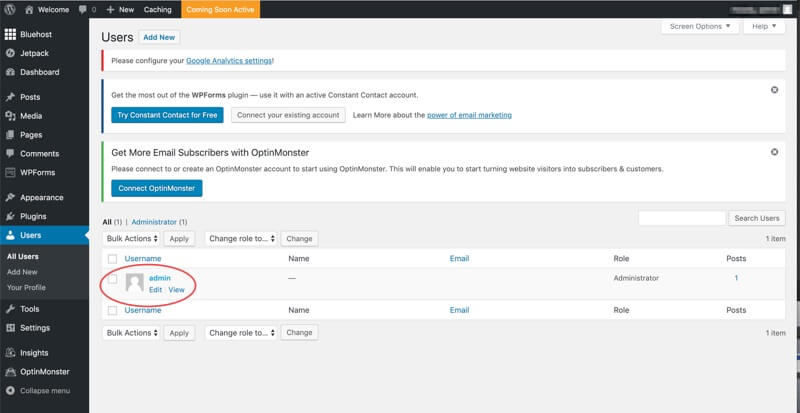
If you do not see any column where there is admin in the username, you can skip this step and continue with the rest of the guide.
NOTE: If your website is not a brand new blog and have published posts already before you delete the admin username, make sure that you attribute all the posts and links on your website to a new user.
This is how you change your admin username:
Go to Users> All Users then hover the admin username in the column. Some links would become visible at the bottom. Go to the delete link.
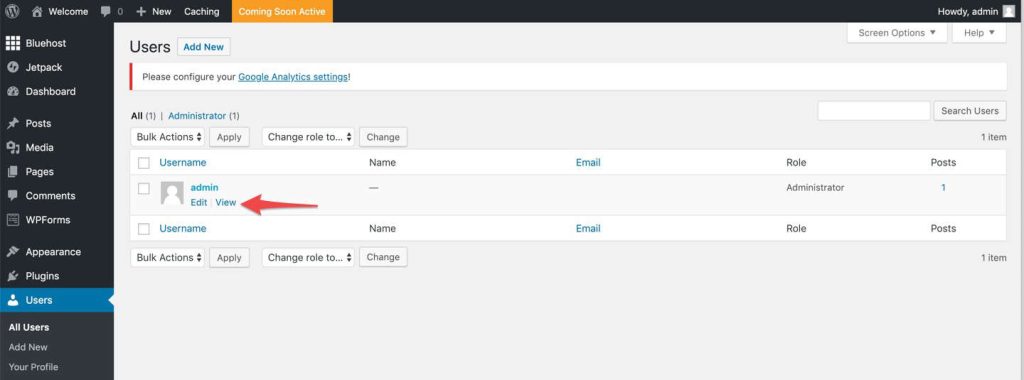
If you do see a delete link when hovering over “admin”.Make sure that you are logged in as an “Administrator” then click delete, attribute content to new user.
If you don’t see a delete link when hovering over “admin”,it means you logged in currently as an admin and cannot delete yourself. Create a new user, log in as the new user then delete admin.
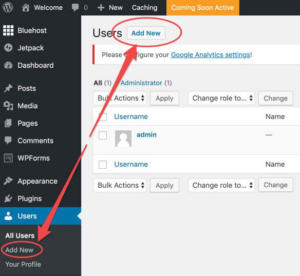
To add a new user, click “Add New” in the left corner at the top of the page.
Fill out the information correctly
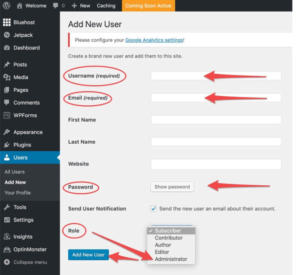
- Enter your new username
- Enter your email address:You might be asked to use a new email address. Put it in a second email address. You can always change the email addresses to your default one after you have deleted the admin username.
- Select a password:make sure that the password you choose is strong to avoid it getting hacked.
- Choose “Administrator” role:It is very important that you chose the “Administrator” role because it has the highest amount of control on your wordpress site.
- Click the “Add new user” button.
The next step would be to log out of WordPress. To do this, go to the top right corner of your homepage then hover over your username to see the logout button.
After logging out, you would be taken to a log in page that looks like this.

Log in with the new username and password that you created.
Next, you go to Users> All Users, then hover over the admin username and click the delete button. It would delete after this.
WordPress would show you a prompt on what you want to do with the content written by the username you are about to delete. You can attribute the content to another user on the website.
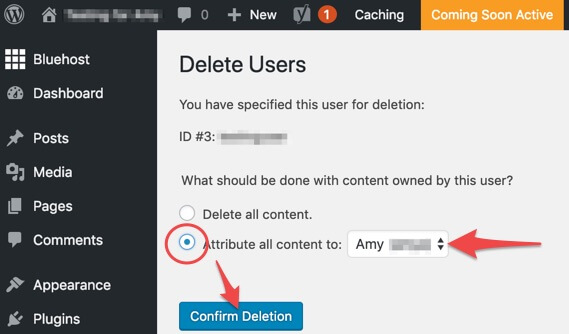
After you are done with this, whenever you log in, you would make use of your new username and password.
If you want to change your email address to the default one. Go back to Users > All Users > hover over the username > Edit > scroll down and enter your main email > click Update User. You would be able to use the email address when you confirm the WordPress link that would be sent to your email.
How to change your site title and tagline
You can change your blog site title and tagline as many times as you want. I recommend that you use something personal or something that would allow your readers to know what your website is all about.
From your dashboard on the left column, click Settings then go to General.

In your title area, you can choose to use your domain name or any other title of your choice. The default tagline on WordPress is “just another wordpress blog“, you would definitely want to change that. Your tagline should be short and describe what your website is about. If you can, add some keywords naturally to help with SEO.
Do not change the temporary URL address that would be displayed.Bluehost would update it automatically when your new domain is ready.
Enter your working email address. If your main email address is not already the option in the box, you should put it there. It is in this email address that you would receive notifications from WordPress.
In the Settings area, apply your appropriate timezone.

The reason why i recommend you use your correct timezone is to help you choose the right time when you are scheduling posts. If you do not put the right timezone, your post might be uploaded before or after the time you had in mind.
Delete default content.
In a new WordPress site, there are default contents that would come with it. There would be a lot of things that would be unnecessary and clutter your site. You should delete them. Some of these things include:
- Plugins.There are some Plugins that are highly unnecessary. If you have excess Plugins on your site, they can slow it down and cause a lot of errors. You should install only Plugins that you absolutely need. Before you delete a Plugin, you would need to deactivate it. In the left column of your dashboard, go to Plugins > Installed Plugins. Hover over the Plugin you want to delete then click on “Deactivate” before you then use the “Delete” link.
- Meta Widget.Having the meta widget on your blog makes you look like a newbie and spoils the aesthetics of your website. You should get rid of it. The meta widget looks like this:
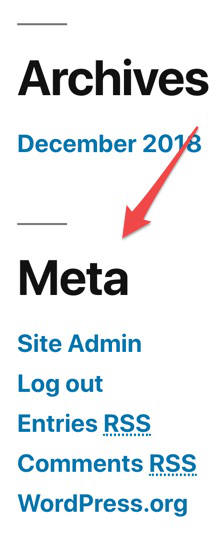
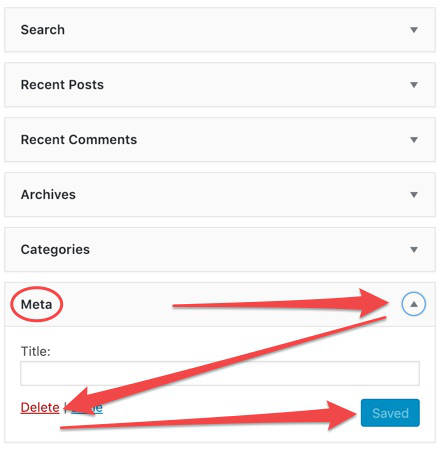
To get rid of it, in the left column of your dashboard go to Appearance > Widgets. You would find the “Meta” widget box on the right-hand side of your screen. To find the delete link, click the tiny arrow down. After you delete the Meta Widget, make sure that you save the changes.
Step 5: Pick Theme Template
Although WordPress is the foundation of your site, there are several steps you can take to change how your site looks. The amazing part is that you do not need to learn any coding before you can do these things by yourself.
There are packages called “themes” that already have the necessary code in them to help change the design of your blog. When you change your theme, the look of your site would also change. You do not need to worry about the content of your blog, changing your site’s theme would not affect your blog post’s content. So you can change your theme and not need to worry about building your website from scratch.
There are thousands of WordPress themes out there, so I would just help you streamline them down to the best ones.
Some of the themes can be fairly expensive. But they are also quality free themes you can try out.
To change your theme, go the left column of your dashboard then click on Appearance > Theme. Then click on the add new button at the top of the page to upload a new one.
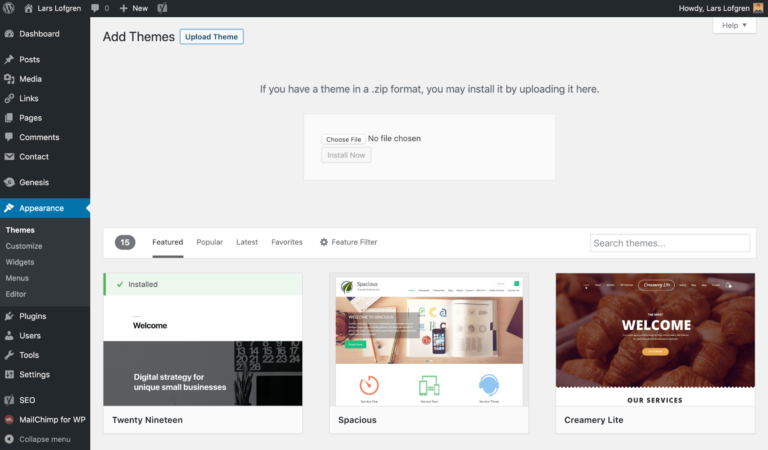
You can manage your uploaded themes from the theme section.

Some of the best wordpress themes.
1 OceanWP
This is a very popular free WordPress theme with lots of premium features. It can be used for any kind of website including blogs, magazines, business sites, and eCommerce sites. It has a lot of features, flexible and easy to set up with live customer support.
2 Astra
This is a fully customizable wordpress theme. It works perfectly with plugins like Beaver Builder, Wix, and Elementor. The theme supports WooCommerce and has translation that can help you create your website in your language.
3 Hestia
This is a very flexible WordPress theme and works with various kinds of websites. It is easy to set up and has a popular free page builder plugin that works very easily with WooCommerce. Items are very easy to arrange with the drag and drop system.
After you have chosen the theme of your choice, go to the theme section under appearance and upload this new theme and the changes would happen with immediate effect.
Step 6: Install WordPress Plugins
One of the amazing things with WordPress is that you can customize it as much as you like. The system is open source which means you can make any changes that you like to the platform.
There is software that you can install to get extra function and customization within WordPress. These plugins help you add extra functionality to your website without needing to write a single piece of code.
Note: Plugins are amazing but you should be careful to install new plugins in moderation and don’t go overboard. Installing hundreds of plugins on your website that you wouldn’t even use would end up causing you a lot of problems eventually. Excess plugins can reduce the speed of your WordPress site.
Why should you be careful with the plugins you install?Having several plugins on your blog can cause conflicts with each other. Some plugin owners do not maintain their plugin regularly and these might cause security risks. When you have a lot of plugins, you won’t know which of them might be causing you problems. Troubleshooting becomes very difficult.
I would limit the plugins on this list to the ones i think are the most needed when you learning how to start a blog. Here are some of my favorites:
- Askimet: This plugin is very necessary especially when you start having a lot of viewers. This plugin would help you filter your comments and get rid of spam. Spam is a problem that many bloggers deal with, luckily Askimet helps you take care of this problem.
- Yoast SEO: Search Engine Optimization is very important if you plan on earning money from your blog. Yoast is the most popular and highly recommended SEO plugin. It takes care of an of SEO tasks for you automatically. On-page SEO becomes a breeze with this plugin and it assists you to rank faster.
- WP Super Cache: This is the best plugin to help you speed up your site. When your website loads faster, it would rank better on Google and your readers would have a smooth experience when reading through your site. The Super Cache reduces file sizes on your blog so that it can load faster.
- Mailchimp for WordPress: This plugin makes it very easy to connect your website to your Mailchimp account. The plugin makes it very easy for you to create email sign up forms and collect email subscribers and grow your list.
- WordPress Popular Posts: This plugin makes it very easy for you to add your most popular posts to the sidebar of your blog.
- Contact Form 7: Set a contact page on your blog with absolute ease using this plugin. The plugin helps you to create a contact form that would collect emails of people that would fill out the form.
- Social warfare: This plugin makes it very easy for your readers to share your blog post on social media.
- MaxCDN: This plugin makes images and other static elements on your blog load faster increasing the speed of your site.
Plugins make it easy for you to customize your website without the need to learn coding. If there is any functionality that you need, just search for it in the plugin search area.
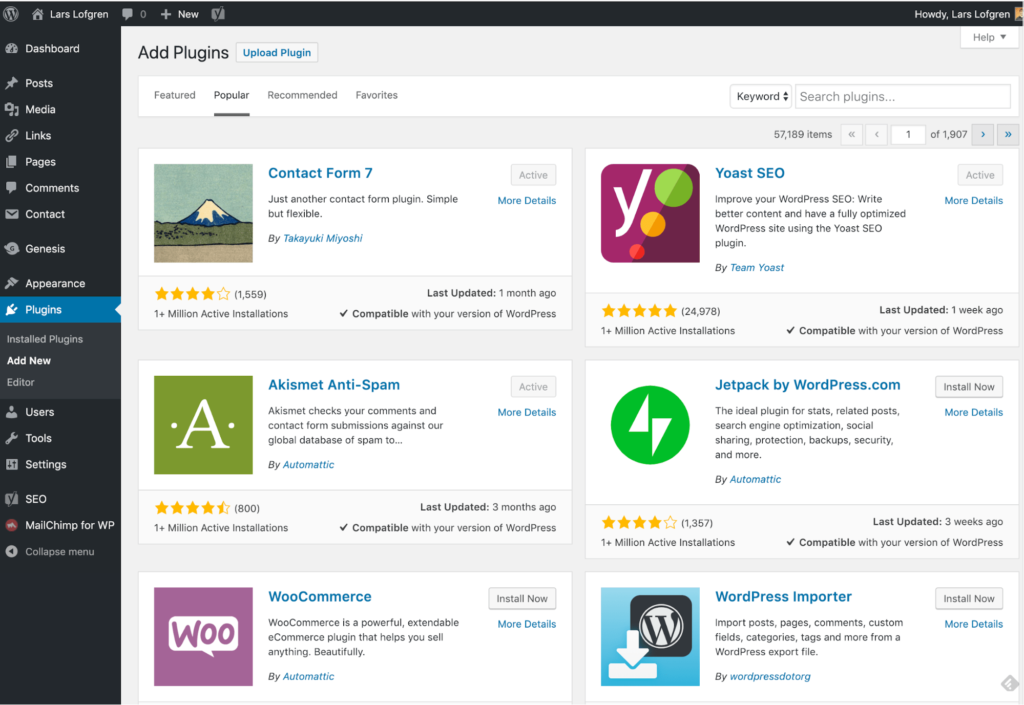
After searching for the plugin you want, install and activate it from within WordPress and start using it immediately.
Step 7: Install Google Analytics
Google created a free website analytics tool. It might be free, but it is also one of the best analytics tools available.
Wondering what analytics is? Analytics is your website data.
Performing site analytics can become complicated and might take a beginner some time to understand how to use it. As a beginner you might not get a hang of Google analytics, it is still very important that you install it into your blog as soon as possible.
Why should you install Google analytics?
Google Analytics would help you store all the data on your site over a long period. You would be happy that you collected all these data over time especially when you’ve got a good understanding of blog analytics.
Also being able to see the amount of people visiting your website, in the beginning, can be very exhilarating. It can serve as a motivation to make you work harder. You can also see what kind of posts draw visitors and the things you can do to increase your traffic numbers.
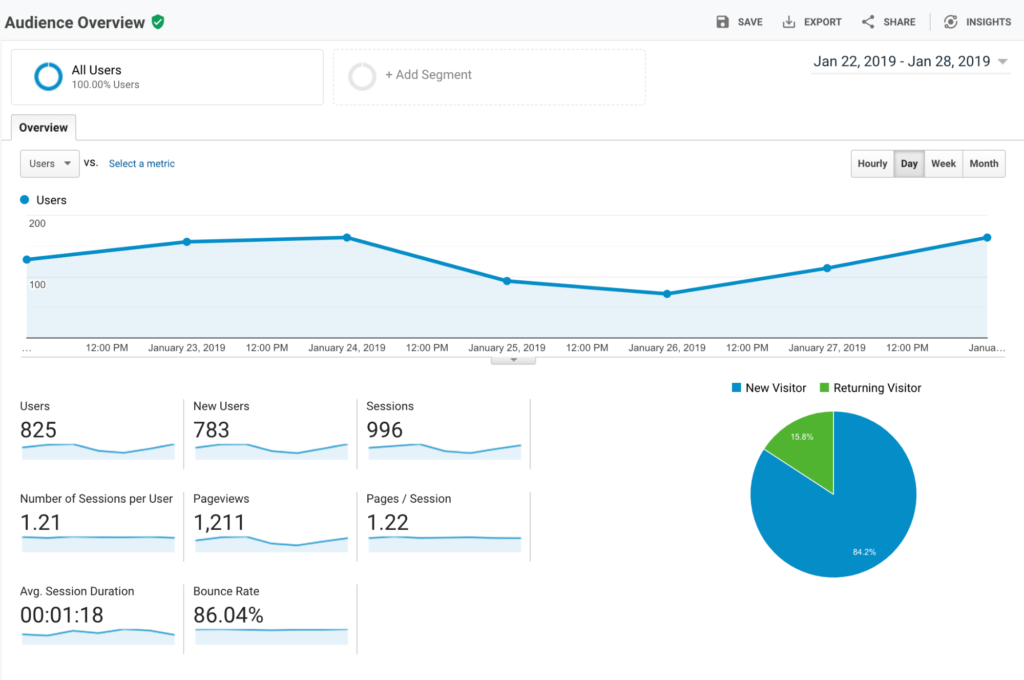
It is also very easy to set up. Follow this link to set up your Google Analytics account.
After setting up your account, you would be giving a unique Javascript tracking code that you would add to your site along with instructions on how to go about it. Copy and paste this code snippet into your site and Google Analytics would start collecting the data for you.
It is time to move on the most important aspect which is the reason why you are learning how to start a blog in the first place
Step 8: Choose What to Blog About
You won’t read a blog because of just the fonts or because it is aesthetically pleasing. These factors would help you have a successful blog but there are not the most important things.
You read a blog because it talks about a topic that you are interested in.
Before you continue reading this guide on how to start a blog, you should ask yourself some very important questions.
Why did you choose this specific topic to write about and do you care about this topic?
Why should people spend time on your site and listen to what you have to say?
Can you add any value to this topic other than what can already be found on the Internet?
To answer this question accurately, you would first have to understand what niche you would be writing in.
What is a niche? And how important is it?
Your niche is the audience that you are trying to target. You have to be knowledgeable enough about this niche so that you can position yourself as an expert.
You don’t need to be passionate about your niche but should have sufficient interest in it so that you can be committed to updating your blog with new posts. This interest would serve as motivation. Without motivation, you won’t put in the needed effort to make your website accessible and in the process grow your audience.
Your niche can be on any topic ranging from longboards, starting an eCommerce store, drop shipping tutorials, it is all up to you.
The importance of a niche is that it gives your blog focus. Your niche plays a lot in determining the design of your website, where and method of marketing your blog and your posting calendar. It is also through your niche that your audience would locate your blog. Having a niche also makes it easy for you to connect with other bloggers and influencers.
There are over 7 billion people in the world and more than half of them are on the Internet. You do not need to write for everybody, you only need to write for the few that would bring you sure leads and interactions.
Are you unsure of what niche you want to write about? Answer some basic questions to help you get started.
- What is an interest that gets you excited? That thing that you have always dreamt of doing.
- What part of your day are you having the most fun?
- What are your hobbies and are the hobbies that you would love to learn?
- What achievements are you proud of?
- What is the one thing that you would be caught doing even if you just woke up from sleep?
After answering these questions you should an idea or two on a topic that you might want to start a blog about.
The next step is to make a list of things that you find easy to do. When you write about things that you already find easy to do, it would be easy for you to show that you are an authority. People love to get advice from authority figures.
It is also important that you are specific. Instead of writing about “cooking” which is a very broad niche, you can write about “cooking for vegans”.
After you have answered all these questions, you would be able to find a consistent pattern and keywords that keep recurring. You should pick out these patterns and keywords then scale them from the ones you like best to the least.
The first item in the list is your new niche. Congratulations!
No matter what niche you choose, there would already be people writing on that topic. What you should understand is that you would have competitors and that is okay. You can edge over your competition with in-depth articles and writing your blog posts with a unique voice.
Understand that it is your experience and voice that would make your website stand out from the pack.
When learning how to start a blog always tell yourself that you have an advantage over your competition which is your unique voice. Everyone has a unique voice, use yours and make your blog stand out.
It is one thing to start a niche and its another thing to know if you would make money from your niche.
If your intention for starting a blog is to earn money, you would have to research the niche you want to write in and if there is a demand for it. Ask yourself this question:
Are people searching for this topic I am writing about?
The value I am adding to the readers of my blog, can it be marketable and help me make money?
To make money from any kind of business, you would first need to solve a problem for people.
Some simple steps to help you know if a niche has enough demand:
- Enter the keywords you trying to target in Google search. If there are millions of results this is a good indicator that they are people that care about this topic.
- There are also some free tools that you can use to check the amount of people searching on a particular topic every month. Some of these tools include SEMrush, KW finder, and Ubersuggest.
If after your research and you see that the keyword gets up to 10,000 – 20,000 monthly search results, this niche can be profitable and potentially monetized. If your result is getting hundreds of thousands of results, i recommend that you streamline it further. The more the volume of search results, the higher the amount of competition.
You should go for low competing keywords with moderate search results as a beginner blogger so that you can rank faster. If you go after the high competing keywords, you would have to fight with more popular established websites for viewers and traffic. Once you have built your website, increased your traffic and domain authority, you can begin to go after harder keywords.
Step 9: Design your Blog
Now that you have learned the technical parts of how to start a blog, it’s time to turn your blog into a work of art.
In step 5 we spoke about how to pick a theme template. In this chapter, we would go more in-depth and discuss how to further customize your website.
Since most of you reading this guide aren’t web developers, having a theme would make organizing your blog a breeze. Your theme is the layout of your blog.
You can either use a free or premium theme on your self hosted WordPress blog. Although most free themes would be limited in the options that you might have, there are several fantastic options.
When searching for a theme to use, there are certain things you should be checking out for.
When learning how to start a blog, why is design important?
You might not care about how your blog might look, but the readers that would be using your site would care.
Reports released by Google and the University of Basel in 2012 shows that users judge a website’s aesthetic beauty and perceived functionality in 1/20th – 1/50th of a second.
What does this mean for you? When a new reader enters your site, it would make them less than a second to decide if they would trust your content.
The design of your blog builds trust and helps you look more like an authority.A good blog design shows that you are interested in making your readers have the best possible experience. You don’t need to use a lot of fonts and a ton of color. A good design is clean and easy to read.
Having a nice theme is a one-time investment that you would not regret and would help attract your audience. When someone visits your site for the first time, your content and design should keep them there.
As a beginner, you might not know what you want your blog to look like. That is not a problem. You can get inspiration from the most popular bloggers in your niche. Look at what they have done with branding, general blog design, and logo. With this knowledge, go ahead and create your blog.
All the inspiration you have gotten from these sites, write them down. They would serve as a template when you begin your design.
There are thousands of themes available, how would you know which of them to use? Some themes look very beautiful but their functionality is minimal.
Your blog design is not only about the feel and look but also how it works.
Before you pick a theme, it should satisfy the following criteria:
- A good theme is simple:You created your blog to share content that would help your readers achieve a particular goal. Sometimes your theme can get in the way of this. If you choose an overly complicated theme with a ton of designs, it can be difficult for your readers to navigate through your blog and find the content they are looking for. Fancy themes that look very complicated are not the right for your blog.
- A good theme is responsive:When your blog is responsive, it would look good on any device – whether it is a laptop, a tablet or smartphone. Mobile responsiveness is very important as the majority of people would read blogs on their smartphones. On my blog, more than 60% of users read using their smartphone. Google also ranks mobile-friendly websites at the top of their search results. You can use their free tools to check the responsiveness of your blog. The name of the tool is Mobile-Friendly Test. Some of the major warnings you look out for is text too small or content wider than the screen.
- How does your theme work in different browsers?Your readers would most likely use different kinds of browsers when using your blog. Before you use a new theme, make sure you test it in several browsers to ensure that it is responsive and works very well.
- What plugins does it support?Plugins are the bedrock of any WordPress site. They increase the functionality x100. When choosing a theme, make sure that it supports the most popular plugins. If you are not sure, you can ask the developer of the theme before you install it.
- SEO Friendliness:SEO or Search Engine Optimization is the system that makes it easy for search engines like Google to bring up your content in results when people search for it. Some themes make use of code that is very heavy and makes it difficult for search engines to go through your site. It would be difficult to inspect a theme’s code for SEO – The step to take before installing any theme is to ensure that it is optimized for SEO.
- Customer Support:Errors occur, and when they do you would need help in fixing them. Make sure that the theme you install would have customer care support.
- Ratings and Review:Before you install any theme, check the ratings and their track record. For free themes in WordPress, below the download button, you would see ratings and reviews by other users that have downloaded them.
My Favorite WordPress Blog Theme
If you are looking for the best themes to set up your blog, get amazing landing pages and even create membership sites, then you should check out my favorite blog theme – OceanWP. OceanWp has an amazing visual editor that makes it very easy for you to design your blog. You don’t need to write a single block of code ever.
When you use this theme, you would not need to hire the services of a web developer before you can make changes to your blog. This is very helpful when learning how to start a blog. It makes life very easy for you since you don’t have any technical ability yet.
OceanWP has some amazing features that would help you grow your online business and grow your business:
- Fully Responsive:Your website would look amazing on any screen.
- eCommerce Ready:The theme is integrated with Woo Commerce to help you easily create a commerce site.
- SEO Base Built-in:The theme was created with Search Engine Optimization in mind
- Translation and RTL Ready:OceanWp supports RTL languages and you can translate into your language.
- Awesome Support:You have a problem? OceanWP comes with amazing support to help you solve them.
- Extensions:The theme has amazing extensions like popup plugin, stick anything and cookie notice.
Since not all of us are design-minded and might also be looking for extra customization and custom design, you can hire the services of a designer. It might be a bit expensive, but if your budget can accommodate it then you can hire someone to take care of it.
Step 10: Create your Key Pages
We are done with almost all the settings and configurations you would do on your site. At this point, you should have an idea of what your blog would look like. In this chapter, we would be creating some content and putting up information of yourself on your site.
The two main contents that your WordPress site is made up of Posts and Pages.
What are Posts?
When you think about a blog, the first thing that would come to your mind are blog posts. Blog posts are singular articles that are written on specific topics. For example, if you have a fitness blog, you can have posts on topics like “The best exercises during the summer” and “Best pre-workout and post-workout meals”. Each of the articles would target a particular keyword. The majority of the time when you add new content to your blog, we are talking about publishing a new post.
What are Pages?
The content seen on pages is more permanent and hardly undergoes any change in information if any at all. The pages on your site would not show in the same portion of your blog where your posts would be displayed. Pages are accessed via direct links in the navigation pane, sidebar or footer of your site. Some pages are constant in every blog. Examples of such pages include the contact and about page.
It is important that you set up some basic pages before you start writing new blog posts on your website. Pages are important because when you start having visitors, they would need where they can go to get general information about you and your blog. These basic pages also makes your site look more credible and increase your trust factor.
Some of the basic pages you should set up:
- Home Page
- Blog Page
- About Page
- Contact Page
- Privacy Policy Page
Home Page. There are two ways you can display your home page depending on your preference. You can list your blog posts on your homepage or you can display a static homepage.
Reason I recommend a static homepage is because it provides an overview of your site. You can also include links to your posts and important aspects of your blog you want to direct people’s attention towards.
Now you know the difference between a lists post home page and a static home page, which one do you prefer? If you want to make use of a static home page on your blog, you should follow these instructions and make the necessary adjustments:
The first step is to create the page that would serve as your homepage. In the left column of your WordPress dashboard, go to Pages > Add New.
Put in the title that would show at the beginning of your homepage. On my homepage, the title is “Welcome”. You can also use something like “Hi, I’m Marvellous.”
It the content area underneath the title, write the content that would be shown on your homepage. In the beginning, it doesn’t have to elaborate and fancy. You can always change things later as your blog grows bigger.
To publish your page, click the publish button at the top right corner of your screen.
To set this page as your home page, enter your dashboard and go to Settings > Reading. Under “Your homepage displays” choose “A static page” button and choose the page that you just created from the menu that would be displayed.
Ensure to save the changes. Visit your site to make sure that the changes have taken effect.
Blog Page. If you are using a static homepage on your blog, you would need a page where you would display your blog posts.
This is how you go about it. Go to your dashboard and select Pages > Add New. Title it “Blog”. Do not add anything to the content area and click publish.
The next step is to go to Settings > Reading. Under “Your homepage displays” > “A static page” select the blog page you just created.
If you want to see if the blog page is working, add “blog” to the end of your URL in the address. If it was this site, I would go to thezeroed.com/blog.
About Page. In most blogs, the about page is the most visited portion of the site. This is the area where most new visitors would visit your site to determine if your site is worth their time. You should try your best to write a good and appealing about page.
Your about page should tell a new visitor what you have to offer them in the first few lines before you move on to information about yourself. When they get to know you, they are more likely to stick around and even subscribe.
After you have explained to them why they should read your blog, you should also direct them to what they should read. Provide links to important pages that you would want to direct them towards.
Contact Page. You must provide a page that your visitors can use to contact you. To run a successful website, you need to build a relationship with your readers.
You don’t need to have an elaborate contact page. A list of where you can found on social media and your email address is sufficient.
Privacy Policy Page. You must have a privacy policy page on your blog. It is also easy to set up.
In your dashboard, go to Settings > Privacy to get all the information that you would need to create your Privacy Policy Page. There would be a draft there that you can use.
Check out my privacy policy page.
Other pages. There are other pages that you can decide to add to your blog immediately or as you grow.
- Resources. Your readers would be glad to check out the tools and resources that you use and recommend for them to try out. You can also earn affiliate earning from these resources. Affiliate income is a good way to monetize your blog.
- Disclaimer/Disclosure Policy.It is important to add a disclosure policy on your site when you start making money. You check out mine here. Use any disclosure policy generator to create yours.
Step 11: Develop Your Content Strategy
You have learned how to set up your blog from steps 1 to 10. In this chapter, you would learn how to build your blog into a site that would attract visitors. It is only when you attract visitors that you would be able to earn a decent income.
More than 63% of businesses do not have a documented content marketing strategy according to research by the Contenting Marketing Institute (CMI) and MarketingProfs.
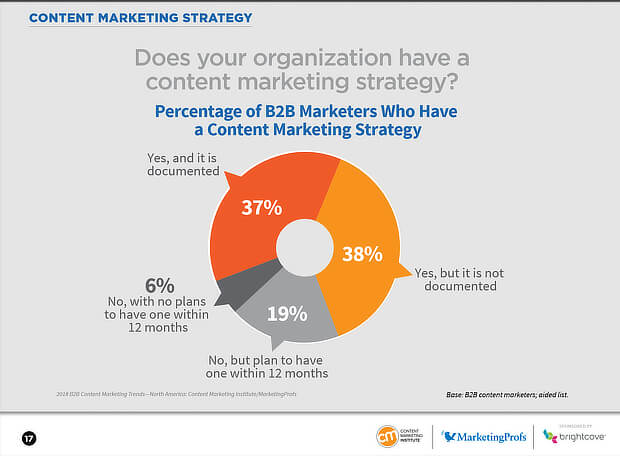
Without any content strategy, your success or failure as a blogger is left to just a matter a chance or luck. Without a proper content marketing strategy, all your efforts might be a waste.
According to marketing charts, 64% of marketers feel that learning how to build a content strategy is their greatest educational need.
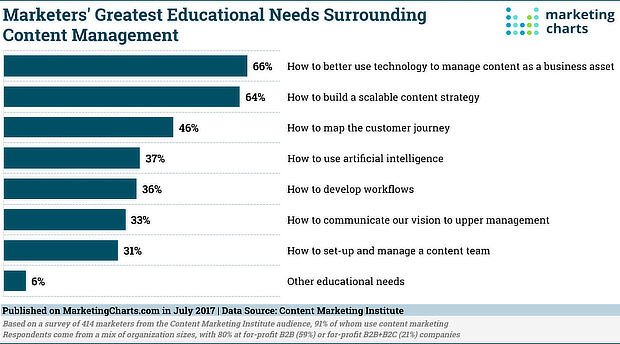
If you are interested in learning how to build your content management system for your blog, you should check out these steps. In this chapter, I would be walking you through the steps that you would take in executing a content marketing plan that would help you grow your blog.
#1. Set Your Mission and Your Goals
The first step to planning your content strategy is creating your mission statement. This statement would help you understand what to focus on – the things that are important and needs your attention and what not to spend all your efforts on.
Questions your mission statement should answer:
- Who is your target audience?
- The content that you would use to get to them
- What benefit would they get from your content?
A template that you can use to create your mission statement:
We provide [target audience] with [type of content] to help them [business goals].
While your mission statement would show what your audience would gain from your content strategy, you should also think about what your blog would gain from your audience. This is what you would refer to as your goals.
Goals that you can try to attain for your blog:
- Getting more traffic.If you can get more traffic to your blog, it would be easy for you to meet your other goals.
- Increasing revenue
- Increasing salesfrom quality leads and interactions on your blog.
- Gaining authority and influencethat would help you to be seen as a thought leader in your niche.
- Reduce your marketing costs
- Increasing your social media engagement.
#2. Establish KPIs
KPIs stands for Key Performance Indicators. They are very important for your content strategy because they help you measure how far you have gone in achieving your goals.
KPIs help you know when you have passed certain milestones in terms of the goals you have set on revenue, traffic, SEO, email marketing and much more. You have to set certain numbers to your KPIs and when you have reached them, you would know if you have reached your target and how much effort you would need to put.
#3. Know Your Audience
This is a mistake that new bloggers make when learning how to start a blog. Most of them do not know their target audience. Before you can create the right content, you have to first know who you are writing for. There are steps you would need to take:
Collect data on demographics
You should collect demographic data on people who visit your blogs, the people who interact with you on social media and your email subscribers.
There are several tools that you can use for web and social analytics. These are the data you would need to collect from your various audiences:
- Age
- Gender
- Education
- Income
If you are using a tool like Google Analytics, you can find this data when you go to Audience > Interests > Overview.

You can also find similar analytical data on social media sites. You can go to Facebook Page Insights to get these data.
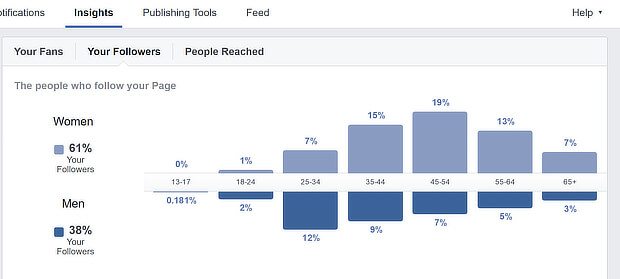
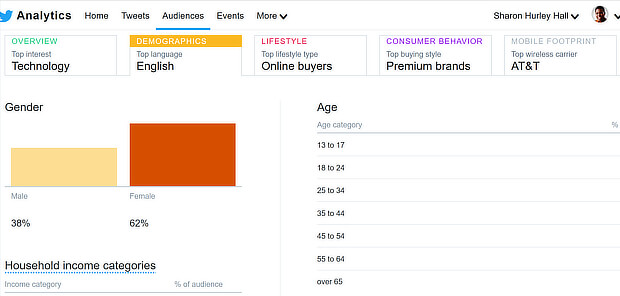
Make use of X (Twitter) analytics to find out information on your follower demographics:
Customer Feedback
Getting customer feedback is another way to collect more information about your audience. Their feedback is very important because it would give you an idea of:
- How they feel about the content you write about
- The kind of contents that they need and prefer to read on your blog
- How you can answer their needs with your problems
- Know the best places to reach your customers.
#3. Figure out the best channels
It is better to focus on the channels where you have the most interactions than trying to do everything at once. Try to understand where your readers are coming from – the places you have the highest social presence and focus on them.
To do this, you’ll need to do some web analytics. The best tool to do this as a beginner is Google Analytics. Enter Google Analytics, go to Acquisition > Social > Overview to see the social networks where you have the highest traction.
Another tool you can use in analyzing your site is Buzzsomo. When you enter the site, go to the Content Analysistool. Click your domain in the search box to view the analysis. These are the results that you would see:
- The average shares by network
- Average shares by content type
- Average share by content length
- Top content in the past year.

When you have this information, you would be able to target these already active social media platforms to increase your engagement and shares for your content.
#4. Decide what kind of content you would be writing
You need to know the kind of content you would be writing on your blog while doing content marketing strategy.
Publishing good content on your site (home base) is the foundation of having a successful content marketing campaign. It is these contents that you can now share on other sites and platforms (outposts).
When you write blog posts, they should meet the following criteria:
- It should actionable
- It should be valuable
- It should be shareable
- The posts on your blog should include a diverse range of article types.
Note: It is better to start small and grow consistently.
When you are consistent with your writing, you would begin to have a good understanding of what works best on your website.
If it is list posts that your readers interact more with, post more of those. If they interact better with infographics, do more of these. Your readers should be your priority. When they are satisfied with your content, they would be more likely to use the share button.
Ensure that your blog posts are informative as well as interesting. That is the only way you would turn one time visitors into subscribers and faithful readers.
#5. Create content before launching your blog
This piece of advice is for new bloggers who have not launched their website yet. You would gain a lot if you already have content ready before your blog goes live.
If you already have a social media following, launching your blog with content on it would help you gain traction fast. If you are lucky, one or two of the posts can go viral.
You might be wondering how many articles would be enough to start with. You can start with as little as one or two articles in your main subcategories. You don’t need to wait till you have 100 blog posts ready before you launch your blog.
The Best Tools for Content Strategy
When you are just starting, content strategy can be a bit overwhelming, but they are certain tools you can use to get started.
These tools would help you with management, organization and keeping you motivated. These are the best tools that I recommend for you:
- Google Docs
- Google Calendar
- Trello
- Asana or Coschedule
- Airtable
You can make use of Trello, Google Docs and Google Sheets to manage your blog content pipeline and manage your ongoing work.
I prefer using Trello because it is visually appealing and motivates me to get my work done. I can also see the progress I have made in writing content for my blog using the in-progress, scheduled and published bars.
Trello is amazing because I get to see everything that is going on in my site at a glance without needing to go deep into Google sheets.
Asana and CoSchedule are productivity and management apps that help you schedule different parts of your content creation process.
#6. Have a regular posting schedule
One of the important things to note before you can run a successful blog is that consistency is key. Since you are reading this guide on how to start a blog, I am sure you want to achieve success as a blogger.
Blogging consistently would give your readers a reason to come back. You keep on giving them amazing content regularly, they would keep coming back for more.
When you blog consistently, your readers would know when to come back to your website every week.
Another reason to blog consistently is that it helps you be on a committed posting schedule. Giving yourself a deadline would help you work better.
Blogging consistently also helps you to understand what kind of content your readers prefer.
The more you publish on your blog, the higher your chances of getting traffic
As a new blogger, you can be too enthusiastic and decide to post a lot. Overcommitting can become a problem in the long run. It is better to publish once or twice a week and stick to that religiously.
Having a content calendar would make your work easier. If you map out all your posts topics for the month before writing along with their deadlines dates, you would know exactly what you should be working on and when to post. You can use either Trello or Google Doc to create your calendar.
The more committed you are in investing in your blog, the more returns you are going to receive from it.
Step 12: Build Your Audience
You should check out this article on the idea of 1000 true fans.
The idea of the article is that with 100 true fans you can be able to support yourself. You would be able to leave your job and work remotely from anywhere in the world.
Note that 1000 true fans is different from having 1000 subscribers. Your true fans are those people that are ready to read all your articles, buy your courses – it is your true fans that would help you monetize your blog.
It might take you a few years to get these fans, but you would eventually get there.
These are the steps you need to take to build your audience and get your 1000 true fans.
- You should post at least once a week. Be consistent with your writing.
- If you have the time, you can increase your postings to 2-3 times per week.
- Even if it once or twice you post a week, ensure that it is of the best quality. When you have a topic that you want to write about, google it first. Check out what other bloggers have published on the topic and write something more in-depth and informative.
- You should also write from a different perspective on things that already exist. Also, do proper research and write on the areas that people have not already covered.
- Be authentic in your writing. Your audience would connect to you better when they can see your authenticity.
- Before you write any post, ask yourself this simple question – “How would this content help my audience?“
Email marketing is one of the most efficient ways to generate leads.
Step 13: Make Your Posts Stand Out (Design & Free Photos)
Did you know that blog posts with images have up to 94% more views than articles without images? Your articles would be also retweeted 150% more on twitter than tweets without images. On Facebook, you would see 2.5x more engagement on posts with images.
Adding a neatly designed image or element can help increase your views and engagement tremendously. It can double the amount of shares you get on each post.
You don’t need to hire a professional photographer or designer to get quality images on your site. If you need to hire a designer for every new blog post, you would be spending a lot when you haven’t even started earning any revenue.
They are free websites and resources that you can use to get quality images for your blog. Even if you are not a designer at heart, these free resources would help you get started with ease.
To pass a point to your readers, you can also share screen-shots of case studies and products.
Some of the best resource I recommend:
- Unsplash
This is one of the best online tools that you can use to get quality stock photos for your blog. The pictures you would see on the sites are of the best quality as they are curated by their team before it is uploaded to their site.
When you use Unsplash, you are not required to give attributes to the authors of the photos, unlike other stock photo sites.
- Pixabay
I use Pixabay a lot on this blog. Their pictures might not be as quality as Unsplash, they still have a huge database of media. They have over 1.4 million pictures, videos, and illustrations on the platform. The quality might not be the best, but you get a lot of content for your blog.
- Death to Stock
This platform is a bit more premium than the other websites I have mentioned. You would have to pay some fee to get access to their pictures. For $12/month you get access to professional photos that you can use on your blog.
- Wikimedia Commons
All the images on this public domain are free to use. You get access to over 21+ million photos and images to choose from.
- New Old Stock
If you are interested in vintage photos, you should check out this site. Depending on your niche and the kind of design you are looking for, you should check out this site.
- Life of Pix
This platform contains pictures that are donated by an advertising agency in Montreal, Canada.
Resources You Can Use for Design
You don’t need to learn photoshop before you can create amazing designs on your website. You can use any of these tools.
- Canva

As a new blogger, I recommend that you go to the site and play around with their designs. The platform is perfect and would help elevate your blog design tremendously. Working on this website is very easy as they have a drag and drop feature to do your designs. You can do practically any kind of design – from Pinterest images, Twitter headers, Facebook posts to infographics.
With the free plan, you would get a ton of resources that should be enough for all your design needs.
- Visme

Visme is an amazing tool for creating infographics and presentations. The tool helps you create custom designs for your blog. When you sign up, you would get access to hundreds of templates that you can use in creating your infographics, presentations, social media posts and lots more.
- Noun Project
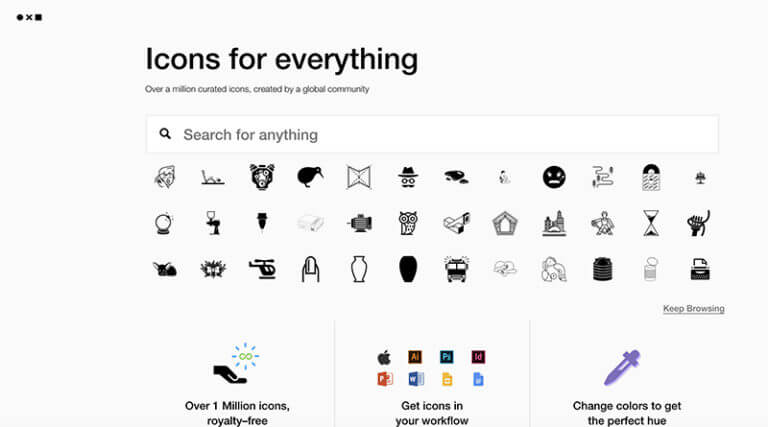
This platform helps you find design icons. There are over 1 million+ royalty-free design icons on the website. Looking for innovative blog icons? Check out this website.
- Subtle Patterns
Freelancers at Toptal create basic blog backgrounds and patterns that you can try out on your website.
- PicMonkey
This platform comes with a cool smartphone app that you can use in editing your photos.
- Pixlr
This is a more advanced tool than all the other design resources I have mentioned above. If you have a background in photoshop, you should check out Pixlr.
How do you know your website is properly designed?
- It should be readable
Design is about making your readers have the best possible experience. Most new bloggers make the mistake of thinking that good design is all about having a ton of colors, crazy fonts, lots of videos and images. What you should get from this guide on how to start a blog is that good design is about minimalism and not flamboyance.
The fonts on your blog should be at least 16px or more. The line length is also important. It is recommended that you have a line length of 50-85 words.
Play around with the fonts and contents until you find out what works best for your readers.
- Add an eye-catching image to the top of your posts
The human brain processes images faster than writing. Capture your reader’s attention in the first 10 seconds of reading your post with relevant images.
Having a relevant image that contains both writing that summarizes your article and a good background image, helps you build a better connection with your audience.
- Use Sub-headings
Nobody wants to read a long block of texts, it can be very intimidating. To avoid having your readers leave your blog early, ensure that you break your post into sub-headings that have up 300-500 words per section.
It can also be lower depending on your niche and how long the article is. This guide has more than 10k words, so I can be a bit liberal with my sub-headings.
- Emphasize important phrases
You should learn to guide your reader through as they read your article. Emphasize important or key phrases in your articles with italics or bold.
Note that this should be used sparingly. Use it when necessary.
- Create eye-catching headlines
Your headlines play a crucial role in driving traffic to your site. Put some effort in writing headlines that are engaging and helps the reader understand what they would gain when they open your article.
Step 14: Publish and Promote your Articles
Congratulations for reaching this far on this guide on how to start a blog. By now you should understand how to design a beautiful site and also how to write compelling headlines and informative posts.
Now we have arrived at the areas where most bloggers find difficult – Promoting your articles. Writing an amazing article without anybody reading can be heartbreaking.
Now that you have learned how to start a blog, how would you drive traffic to this new blog?
To build a successful blog, you should spend as much promoting it as you would spend writing it.
Here are some ideas that you can try to drive traffic to your website:
Social Media
If you blog consistently, you would have an idea of the social media networks where your audience is most active. Share your content regularly in these networks.
The most popular social media networks are Facebook, Twitter, LinkedIn, Pinterest, Reddit, Snapchat, and Instagram. The key is to find the one that best suits your niche and audience.
It would be a waste of your time if you are sharing your posts on all social media platforms. It’s best to concentrate your efforts in places that you would receive the best return.
Experiment regularly until you find out what works best for you.
There are certain kind of contents that works best for different platforms:
- Facebook:Videos and curated content works best on this platform.
- Instagram:Higher resolution photos, unique quotes, and stories.
- Pinterest:Infographics and visual content works here.
- Twitter:Blog posts, News, Gifs and short videos.
- LinkedIn:Career and professional information.
- Reddit:Commentary on the things you have written on your blog.
All these might feel overwhelming and you don’t even know where to get started. There are certain tools you can use to manage your social media handles and posts frequency. You can use this tool to schedule how many times you want to publish your articles in a week.
Buffer: This is one of the most popular tools that is used for scheduling social media posts. It works perfectly for the most popular social media platforms. They also have a browser plugin that makes it easy for you to schedule posts without having to go to the website. This browser add-on helps to increase your efficiency and productivity.
Hootsuite: This platform might be too much for a beginner blogger as it is very expansive. It doesn’t hurt to check it out though. Hootsuite is a powerful scheduling, social sharing and monitoring platform.
Gain App: If you have more than one person writing on your blog, you can use Gain. It is a collaborative social media shares and scheduling platform. It’s a bit expensive, but it is worth the price.
Be Active on Forums and Message Boards
When you are active on social media forums and message boards, you can create better connections with people in your niche and also drive traffic to your blog.
Look up forums and boards that are on topics that are related to your blog. When you join a forum, don’t just dump your links, you would be removed for spamming. The right step to take is to give value and participate before you can chip in your blog link.
Add value before you ask for something in return.
You can find amazing groups and forums for almost any niche on Facebook, LinkedIn, and Reddit. You just need to do proper research until you find platforms that suit your blog.
You can also search for forums on Google.
Search Term: “Forum + Niche name”, “Forum + Keyword, Forum + Niche + Social media platform.”
Guest Posting
Guest posting is a good way to build backlinks, connect with people in your niche, increase your authority and drive traffic to your site.
As a beginner, it might be difficult to get guest blogging opportunities in high domain authority sites. You can start by writing for smaller blogs in your niche. As you build your portfolio, you would be able to write for bigger blogs.
You can also try writing for platforms like medium and quora. When you provide value in such sites, people would want to go back to your blog for more valuable content.
Email Newsletter
One of the best and easiest ways to promote your content is not by looking for a new audience but by using the one you already have.
The greatest weapon you have in your arsenal as a blogger is your email newsletter. It is through your email newsletter that you would get your subscribers engaged and also remind them to keep reading your blog.
Building your email list is not difficult. All you have to do is to put sign-up in your posts. It also helps if you give them an incentive to help them subscribe. An incentive can be a free eBook, a free course or coupon depending on your niche.
I use Mailchimp on my blog, you can use other tools like Convert kit and Aweber to collect emails.
Other ways you can drive traffic to your site:
- Do interviews for people in your niche:If you interview writers in your niche, you can build relationships with them. They would also share the interview with their readers bringing more traffic to your site in return. You also get some backlinks that would help build your ranking.
- Mention other bloggers in your posts:People love when you acknowledge them. When you mention them, you can send them an email telling them that you mentioned them. The majority of bloggers would be kind enough to share the post on their social media platforms.
- Learn from other top bloggers in your niche and copy what they are doing.
Step 15: Monetize your Blog
The most serious steps you can take in monetizing your blog are by using affiliates and info products. These two methods can help you generate serious revenue.
How do you use info products
- Get traffic to your site
- Give new readers a convincing reason to subscribe to your email newsletter.
- After they have subscribed, run them through a launch funnel. What is a launch funnel? These are emails that you would send to subscribers that are designed in a way to sell info products. An info product can be a course that includes video tutorials.
- You can sell a course for as high as $500-$2000. For every new subscriber, you can covert about 0.55% to 1%. As you increase your subscriber list, your revenue would increase tremendously.
Two things you would need to know before selling info products
- You need to have an amazing direct response copy before you might make reasonable sales.
- Being in the right category or niche helps. The most popular are niches that discuss making money, changing your status and relationships.
How do affiliates work?
The principle is quite simple. As you grow your audience to a sizable amount, you recommend products that would be useful to your audience in your content. When your audience clicks on the products using your tracking code, you get a commission whenever they make a purchase.
Affiliate works best when you have huge traffic to your blog. Most readers might click on a link and might not end up purchasing. Only a small percentage of clicks convert into sales.
Other ways you can monetize your blog
- Selling your books on your blog. This also increases your credibility and authority.
- You can sell banner ads like Google Ads on your blog. I advise though that you don’t bother doing this. You are most likely not to earn any money and it can also make your site slow.
- You can do speaking gigs whenever you get the opportunity.
Step 16: Best Places to Find Designers For your Blog
There are a lot of places where you can find freelance designers to help you with your blog. These are a few good suggestions you can try out:
Upwork
This is one of the largest marketplaces for freelancers in the world. You would find some of the best freelance designers on the site of different price ranges and experience. You would find web designers or graphic designers that work from home or looking for remote jobs on the site. All you have to do is post your job and the freelancers would send you proposals and you select the best.
Fiverr
Remote jobs are posted on this site for as low as $5. Note that for complex jobs like web design you would pay much more higher. Check out the profiles of the highest-ranking designers and make your choice.
99 Designs
This marketplace works differently from other freelance sites. Freelancers get jobs from the site after participating in contests. When you post your job description, several designers on the site would compete for the job. If you are not sure of what you want, you should check out this platform. You would get to view ideas from multiple people.
Before you hire any designer, do your homework first. Have an idea of what you are looking for so that you won’t get confused. If you are looking for more options on where you can find freelance designers, you should check this list of the best freelance job sites.
Step 17: Frequently Asked Questions (FAQ)
How much does a blog cost?
For a beginner on a budget, you can get your blog set up for less than $10 a month. As your audience and income grows, you can then upgrade to more premium hosting and tools.
Can you start a blog for free?
You can create your blog for free in less than half an hour using blogging platforms like Medium, Tumblr and Blogger. If you want to start blogging as a hobby, you can check out these platforms.
If you are interested in making money blogging, you should invest some money in some affordable but paid options. You can use a good option like Bluehost that we covered in this guide.
How much time does it take before you can start making money from blogging?
If you are talking about the first time you can earn anything from your blog, you can start earning in your first month. If you are wondering how long it would take you to earn a sizable income, it can take you anywhere from 3 months to 6 months. The more time you spend blogging and your traffic grows, the higher your earning capacity.
How often should I update my blog?
You must post regularly. Your blog posts are what keeps your blog alive. I recommend that you post at least two times a week. Publishing at least twice a week helps your blog indexing, as Google will set a crawl rate accordingly.
How long should my blog posts be?
Some bloggers would tell you that long content would convert better than shorter content. I say that the length of your blog post depends entirely on your topic.
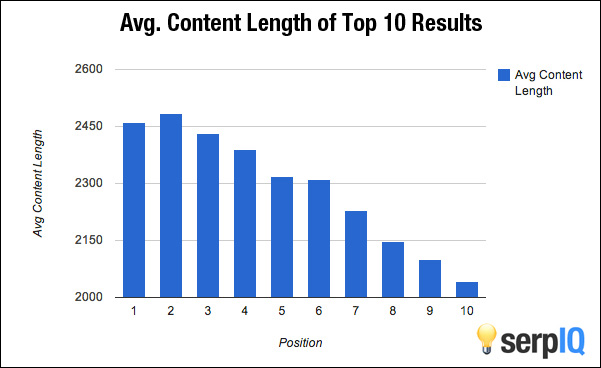
From an SEO standpoint, the highest performing posts are the ones with an ideal length of about 2000+ words. Note that it isn’t all about word count, content quality is also important.
What should my first post be about?
Your first post should describe who you are and the kind of content that you would be writing about. Tell your new readers what you would be offering them in terms of value and how you would be keeping in touch with them.
Can I change my blog theme?
Yeah, you can change the theme of your blog at any time. You have to ensure that whatever theme you are switching to is SEO optimized. You don’t want to lose all your search engine traffic by switching to a bad theme.
Was this post helpful and did it answer your questions on how to start a blog? Would you mind sharing this post with others that might appreciate this guide as well? Thanks for sharing.
